As an Amazon Associate, I earn from qualifying purchases.

Are you planning to sand your woodwork with an electric sander? Sanding wood can be a challenging task if you do not know the right techniques. However, using an electric sander can make the job much easier and quicker. In this article, we will guide you through the steps of sanding wood with an electric sander.
Contents
- Tools And Materials Needed
- Step-By-Step Guide To Sanding Wood With An Electric Sander
- Step 1: Prepare The Area
- Step 2: Choose The Right Sandpaper
- Step 3: Attach Sandpaper To The Electric Sander
- Step 4: Wear Protective Gear
- Step 5: Turn On the Electric Sander
- Step 6: Sand With Coarse Grit Sandpaper
- Step 7: Sand With Finer Grit Sandpaper
- Step 8: Clean The Wood
- Step 9: Repeat The Sanding Process
- FAQs
Tools And Materials Needed
Before you start sanding, make sure you have the following tools and materials:
- Electric sander
- Sandpaper (different grits)
- Dust mask
- Safety goggles
- Earplugs or earmuffs
- Vacuum cleaner or dustpan and brush
- Painter’s tape (optional)
Step-By-Step Guide To Sanding Wood With An Electric Sander

Step 1: Prepare The Area
Clear the workspace of any unnecessary items and cover the surrounding areas with a drop cloth to protect them from dust and debris. Use painter’s tape to cover any areas you do not want to sand.
Step 2: Choose The Right Sandpaper
Choosing the right sandpaper is crucial for achieving the desired result. Start with a coarse grit sandpaper and gradually move to finer grits. The grit number indicates the coarseness of the sandpaper – the higher the number, the finer the grit.
Step 3: Attach Sandpaper To The Electric Sander
Follow the manufacturer’s instructions to attach the sandpaper to the electric sander. Make sure the sandpaper is securely attached and aligned with the sander’s pad.
Step 4: Wear Protective Gear
Wearing protective gear is essential when sanding wood. Put on a dust mask, safety goggles, and earplugs or earmuffs to protect yourself from dust and noise.
Step 5: Turn On the Electric Sander
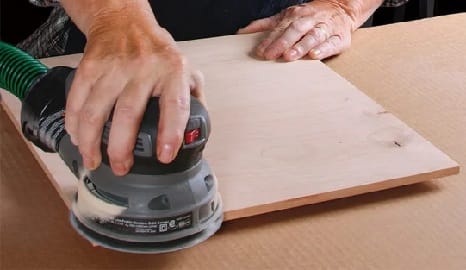
Switch on the electric sander and wait for it to reach full speed before beginning to sand. Move the sander along the grain of the wood, using gentle and even pressure.
Step 6: Sand With Coarse Grit Sandpaper
Start sanding with the coarsest grit sandpaper. Hold the sander firmly and move it in a back-and-forth motion along the grain of the wood. Sand evenly and avoid sanding in one spot for too long, as this can create dips and grooves in the wood.
Step 7: Sand With Finer Grit Sandpaper
Once you have finished sanding with the coarse grit sandpaper, switch to a finer grit sandpaper. Repeat the sanding process, making sure to remove any scratches or marks left by the previous sandpaper.
Step 8: Clean The Wood
Clean the wood thoroughly after sanding, using a vacuum cleaner or a dustpan and brush. Wipe the surface with a clean, dry cloth to remove any remaining dust or debris.
Step 9: Repeat The Sanding Process
If you need to achieve a smoother surface, repeat the sanding process with even finer grit sandpaper until you achieve the desired result.
FAQs

Is it better to sand wood by hand or with an electric sander?
Using an electric sander can be much quicker and more efficient than sanding by hand, but it is essential to follow the correct techniques and use appropriate protective gear.
How do I know when to switch to a finer grit sandpaper?
You should switch to a finer grit sandpaper once the scratches or marks left by the previous sandpaper have been removed.
How often should I change the sandpaper on my electric sander?
You should change the sandpaper once it becomes worn or clogged with dust and debris.
Can I sand painted or varnished wood with an electric sander?
Yes, but you will need to use a coarse grit sandpaper to remove the paint or varnish before switching to finer grits for a smooth finish. It is also important to wear appropriate protective gear and work in a well-ventilated area.
Conclusion
Sanding wood with an electric sander can be a quick and efficient way to achieve a smooth and even finish. However, it is essential to follow the correct techniques and use the appropriate protective gear to avoid any accidents or injuries. By following the step-by-step guide outlined in this article, you can achieve professional results with ease.


