As an Amazon Associate, I earn from qualifying purchases.
 This guide will show you how to change belt sanders paper. Belt sanders are a common tool in the tool box of many professional woodworkers. However, they can also be used for a variety of other tasks, such as creating detailed illustrations, carving, and other crafts. To be a successful belt sander user, it is important to understand the different types of belt sanders and the different settings that can be used. This guide will show you how to change belt sanders paper using the different settings.
Contents
How To Change Belt Sander Paper?
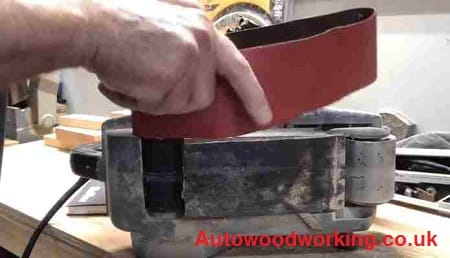
Changing the paper on your belt sander is a quick and easy way to improve the performance of your tool. Whether you are replacing a worn-out belt or just want to try a different grit, follow these steps to get the job done.
- Unplug your belt sander and allow it to cool down completely.
- Loosen the screws on the front cover of the tool.
- Lift the cover off and set it aside.
- Loosen the screws on the belt guard and lift it off.
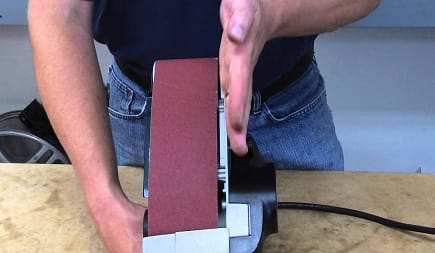
- Remove the old belt and discard it.
- Install the new belt, making sure the teeth are facing the correct direction.
- Reattach the belt guard and screws.
- Reattach the front cover and screws.
- Plug in your belt sander and allow it to start up.
- Test the tool by running it over a piece of sandpaper.
Select the Correct Sandpaper Grit
When it comes time to change the sandpaper on your belt sander, it is important to select the correct grit. The grit is the measure of the size of the abrasive particles on the paper and is given as a number. The higher the number, the smaller the particles and the smoother the sandpaper. For general purpose sanding, a grit of 60 is a good starting point. If you are sanding something that is already smooth, such as a finished piece of wood, then you may want to start with a grit of 100.
Remove the Old Sandpaper
It is important to remove the old sandpaper from your belt sander before you install new sandpaper. This will ensure that the new sandpaper will last longer and provide a better sanding surface.
To remove the old sandpaper, first remove the sanding belt from the sander. Next, use a putty knife or another flat-edged tool to scrape the old sandpaper off of the platen. Be sure to scrape in the direction of the grain to avoid damaging the platen.
Once the old sandpaper is removed, clean the platen with a damp cloth to remove any residue. Allow the platen to dry completely before installing the new sandpaper.
Install the New Sandpaper
If your old sandpaper has lost its grit, or you simply want to change the type of paper you’re using, it’s easy to install new sandpaper on your belt sander. You’ll just need to make sure you have the right supplies and take a few safety precautions. With a little bit of effort, you’ll be back to sanding in no time!
To start, you’ll need to gather some supplies. You’ll need new sandpaper, of course, as well as a set of pliers. You’ll also need a flat surface to work on, like a table or counter.
Once you have your supplies, you can begin the process of changing your sandpaper. Start by unplugging your sander from the power source. Then, use the pliers to loosen the screws that hold the sandpaper in place. You may need to use a bit of force, but be careful not to strip the screws.
Once the screws are loose, you can remove the old sandpaper. Be careful not to touch the belt with your bare hands, as it can be quite hot. If the old sandpaper is glued on, you may need to use a putty knife or other tool to remove it.
With the old sandpaper removed, you can now install the new sandpaper. Start by lining up the holes in the sandpaper with the screws. Then, use the pliers to tighten the screws until the sandpaper is secure. Be careful not to over-tighten the screws, as this can damage the sandpaper.
Finally, plug in your sander and give it a test run. If the new sandpaper is installed correctly, it should work just like the old one.
Follow the Manufacturer’s Instructions
When working with any type of power tool, it is important to follow the manufacturer’s instructions. This is especially true when changing the belt on a belt sander. Improperly changing the belt can result in damage to the sander or injury to the user.
The first step is to unplug the sander from any power source. Once the sander is unplugged, you can begin removing the old belt. The old belt is usually held in place by two screws. Remove the screws and then carefully remove the old belt.
Next, you will need to install the new belt. Begin by threading the new belt through the sander’s pulleys. Once the new belt is in place, you can secure it with the two screws. Be sure to tighten the screws securely.
Once the new belt is in place, you can plug in the sander and test it out. Be sure to use the sander in a safe area and always wear proper safety gear.
Conclusion
A belt sander is a great tool for sanding down large surfaces quickly. However, the sandpaper on a belt sander can wear down quickly. We have shown you how to change belt sander paper so that you can continue to use your belt sander to its full potential.


