As an Amazon Associate, I earn from qualifying purchases.
Setting up a router table can greatly enhance your woodworking projects by providing precision, control, and versatility. Whether you’re a beginner or an experienced woodworker, a router table can be a valuable addition to your workshop. In this article, we will guide you through the process of setting up a router table, along with tips, techniques, and safety precautions to ensure a smooth and successful woodworking experience.
Contents
Understanding Router Tables
What Is A Router Table?
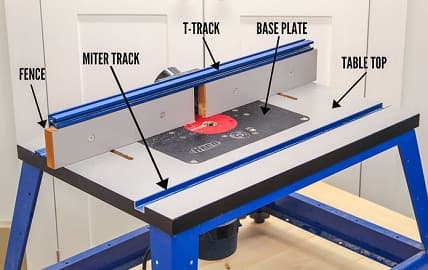
A router table is a woodworking tool that consists of a flat surface, a fence, and a mounting plate designed to hold a router. It offers stability, control, and versatility, allowing woodworkers to perform various routing operations with greater accuracy. The router is mounted upside down beneath the table, and the bit protrudes through a hole in the surface.
Benefits Of Using A Router Table
Using a router table provides several advantages over hand-held routing. Some of the key benefits include:
- Increased precision: The stability and adjustable features of a router table enable more precise cuts and consistent results.
- Safety: The table design provides better control and reduces the risk of accidents compared to freehand routing.
- Versatility: A router table opens up a wide range of woodworking techniques and allows for the creation of complex shapes and profiles.
- Improved efficiency: By securing the workpiece and guiding it along the fence or using templates, you can achieve faster and more accurate results.
Types Of Router Tables
Router tables come in various designs and sizes to cater to different woodworking needs. Here are the three main types of router tables:
Benchtop Router Table: This compact and portable option is ideal for woodworkers with limited space or those who need to transport their router table to different locations. It can be easily placed on a workbench or table, providing stability and functionality.
Standalone Router Table: This type of router table comes with its own stand or base. It offers a larger work surface and additional storage options, making it suitable for woodworkers who have a dedicated workshop space. Standalone router tables are sturdy and provide ample support for larger projects.
Router Table Extension: This option is designed to be attached to an existing table saw or workbench. It maximizes the use of space by utilizing the existing structure. Router table extensions are a cost-effective solution for woodworkers who already have a table saw and want to expand their capabilities.
Setting Up Your Router Table
Now that you understand the basics of router tables, let’s delve into the process of setting up your router table:
Choosing The Right Location
Select a well-lit area in your workshop that provides enough space for comfortable movement around the router table. Ensure that the location is sturdy and level to prevent any wobbling during operation.
Assembling The Table
Refer to the manufacturer’s instructions to assemble the different components of your router table. This typically involves attaching the legs, braces, and table surface. Ensure that all the connections are secure and tightened properly.
Mounting The Router
The router is the heart of your router table setup. Follow these steps to mount the router:
- Select a compatible router that fits the mounting plate of your router table. Check the manufacturer’s guidelines for recommended routers.
- Attach the router base to the mounting plate using the provided screws or clamps. Ensure that it is securely fastened.
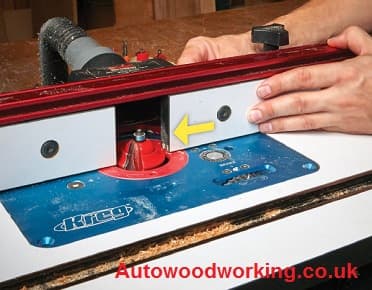
- Insert the router into the router table’s opening from the underside, allowing the bit to protrude through the table surface.
- Use the router table’s built-in height adjustment mechanism to set the desired router bit height.
Installing The Necessary Accessories
To enhance the functionality and safety of your router table, consider installing the following accessories:
- Fence: The fence acts as a guide and reference point for your workpiece. It helps in maintaining consistent cuts and prevents the wood from wandering off course. Install the fence parallel to the router bit and adjust it to the desired distance from the bit.
- Featherboards: Featherboards are placed on the fence or the table surface to provide additional support and control over the workpiece. They prevent kickback and ensure a smooth feed during routing.
- Dust Collection System: Woodworking can create a significant amount of dust and debris. Installing a dust collection system helps keep your workspace clean and improves visibility while routing. Connect a vacuum or dust extractor to the router table to collect the dust effectively.
- Push Sticks and Push Blocks: These safety accessories are used to guide and push the workpiece along the router table. They keep your hands a safe distance from the router bit, reducing the risk of accidents.
Adjusting And Maintaining The Router Table
Once your router table is set up, it’s important to make some adjustments and perform regular maintenance to ensure optimal performance:
Adjusting The Router Height
The height of the router bit plays a crucial role in achieving the desired cuts. Use the height adjustment mechanism on your router table to raise or lower the router bit to the appropriate position. Test the height on a scrap piece of wood before routing your actual workpiece.
Setting The Fence And Guides
Position the fence parallel to the router bit and adjust it to the desired distance. Use the measurements and markings on the router table to ensure accuracy. Additionally, check and adjust the guides or miter slots on your router table. These guides help in guiding the workpiece along the table, ensuring smooth and precise cuts.
Lubricating Moving Parts
To maintain smooth operation, regularly lubricate the moving parts of your router table, such as the height adjustment mechanism and the fence adjustment mechanisms. Use a recommended lubricant or a dry lubricant to reduce friction and ensure ease of adjustment.
Cleaning The Table
After each use, clean the router table to remove any dust, debris, or wood chips that may have accumulated. Use a brush or a vacuum cleaner to thoroughly clean the surface, fence, and miter slots. Keeping your router table clean will not only extend its lifespan but also contribute to the accuracy of your woodworking projects.
Safety Precautions And Best Practices
When working with a router table, it’s essential to prioritize safety. Here are some key safety precautions and best practices to keep in mind:
Using Safety Equipment
Always wear appropriate safety equipment, including safety goggles, hearing protection, and a dust mask. These items will protect your eyes, ears, and lungs from potential hazards, such as flying debris and excessive noise.
Avoiding Common Mistakes
Pay attention to the direction of the router bit rotation. Feed your workpiece against the rotation of the bit to prevent kickback. Additionally, avoid climbing cuts, where the workpiece is fed in the same direction as the bit’s rotation, as this can lead to accidents and poor results.
Understanding Feed Direction
Understand the correct feed direction for different routing operations. In general, feed your workpiece from left to right when routing along the fence, and from right to left when using a miter gauge or template. Following the correct feed direction ensures smoother cuts and reduces the risk of kickback.
Handling the Router Bits
Handle router bits with care. Always ensure that the router is switched off and unplugged before changing or adjusting bits. Use the appropriate wrenches to tighten or loosen the collet nut, and never overtighten the bit. When not in use, store your router bits in a secure and organized manner to prevent damage.
Basic Techniques For Router Table
Once your router table is set up and you have familiarized yourself with safety precautions, you can begin exploring various woodworking techniques. Here are some basic techniques you can perform using a router table:
Edge Routing
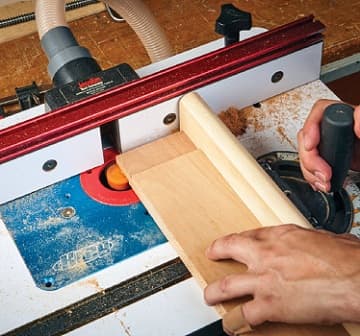
Router tables excel at edge routing, allowing you to create clean, consistent profiles on the edges of your workpiece. Set the fence at the desired distance from the bit, and guide the workpiece along the fence to achieve a precise edge.
Rabbeting
Rabbeting involves cutting a groove along the edge or the surface of a workpiece. Use a straight bit and adjust the height and fence position to achieve the desired depth and width of the rabbet.
Dadoes and Grooves
Router tables are great for cutting dadoes and grooves, which are channels or slots cut across the grain of the wood. Use a straight bit and adjust the height and fence position to achieve the desired dimensions of the dado or groove.
Router Table Joinery
A router table can be used for various joinery techniques, such as making mortises, tenons, and box joints. With the help of jigs and templates, you can create strong and precise joinery that adds structural integrity to your woodworking projects.
Advanced Techniques For Router Table
Once you have mastered the basic techniques, you can explore more advanced applications of the router table. Here are a few examples:
Raised Panel Doors
Router tables are commonly used to create raised panel doors, adding a touch of elegance to cabinets and furniture. By using specific router bits and profiles, you can achieve beautifully detailed raised panels.
Box Joints and Dovetails
Router tables are ideal for creating box joints and dovetails, which are popular joinery techniques used in cabinet making and furniture construction. With the help of dedicated jigs or templates, you can achieve precise and strong joints that add visual appeal to your projects.
Template Routing
Template routing allows you to reproduce intricate shapes and patterns with ease. By using a template and a flush-trim bit, you can create multiple identical pieces or replicate complex designs on your workpiece.
Decorative Edge Profiles
Router tables offer a wide range of options for creating decorative edge profiles on your workpiece. From simple round-overs to intricate ogee or cove profiles, you can add decorative touches that enhance the aesthetic appeal of your projects.
Troubleshooting And Tips
While working with a router table, you may encounter certain challenges or have questions. Here are some troubleshooting tips and general advice to help you achieve better results:
Router Table Issues And Solutions
- If you experience excessive vibration or noise, check if the router is securely mounted and the bit is properly balanced. Also, ensure that the router table is stable and level.
- If you notice burning or chattering during cuts, it may indicate a dull router bit. Replace the bit with a sharp one to achieve cleaner cuts.
- In case of inaccurate cuts or inconsistencies, check the alignment of the fence and guides. Make necessary adjustments to ensure precise routing.
Tips For Achieving Better Results
- Start with light passes and gradually increase the depth of cut to avoid overloading the router and achieving cleaner results.
- Use a router table featherboard or hold-downs to ensure a secure and steady feed of the workpiece, minimizing the risk of kickback.
- Consider using a router table insert plate with multiple insert rings. This allows you to use different sizes of bits and provides better support for smaller workpieces.
- Experiment with different router bits and profiles to explore new design possibilities and add variety to your woodworking projects.
FAQs
Can I use any router with a router table?
Most routers can be used with a router table, but it’s essential to check compatibility and ensure a secure mounting system.
How often should I clean the router table?
It’s recommended to clean the router table after each use to remove dust and debris for optimal performance.
Is it necessary to wear safety goggles while using a router table?
Yes, wearing safety goggles is crucial to protect your eyes from flying debris and wood chips.
Can I perform intricate woodworking tasks on a router table?
Absolutely! A router table provides the stability and control required for intricate woodworking tasks, such as making dovetails or decorative edge profiles.
How long does it take to master using a router table?
Mastering the use of a router table depends on individual learning abilities and practice. With consistent practice and experimentation, you can become proficient in a relatively short period.
Conclusion
Setting up a router table opens up a world of possibilities for woodworking enthusiasts. By following the steps outlined in this article, you can create a solid foundation for your router table setup, allowing you to perform various woodworking techniques with precision and safety. Remember to adhere to safety precautions, maintain your router table regularly, and continue learning and experimenting to expand your skills.


