As an Amazon Associate, I earn from qualifying purchases.
Cutting tapers on a table saw allows you to create angled edges on your woodwork projects, adding an aesthetic appeal and dimensionality to your pieces. Whether you’re a professional woodworker or a DIY enthusiast, learning how to cut tapers on a table saw opens up a world of possibilities for your projects. In this article, we will guide you through the process step by step, ensuring you achieve precise and accurate taper cuts every time.
Contents
What Is A Taper?
A taper refers to a gradual reduction in width or thickness. It is often used to create wedges, legs, or slanted edges on furniture and other wooden objects. Tapers can range from subtle, gentle angles to more pronounced and dramatic slopes, depending on the desired effect. By understanding the principles of taper cutting, you can add a unique touch to your woodworking projects.
Importance Of Cutting Tapers
Cutting tapers allows you to create visually pleasing and structurally sound pieces. Tapered legs, for example, provide stability and prevent wobbling in furniture. Moreover, tapers add an artistic element to your work, elevating it from simple straight lines to dynamic and eye-catching designs. With the right technique and attention to detail, you can transform ordinary pieces into extraordinary works of art.
Tools And Materials Needed
Before you begin cutting tapers on a table saw, gather the necessary tools and materials. Here’s a list of items you’ll need:
- Table saw
- Tape measure
- Pencil or marking knife
- Push stick or push block
- Safety glasses
- Dust mask or respirator
- Workpiece (piece of wood)
Ensure that your table saw is in good working condition, with a sharp blade and accurate adjustments.
Safety Precautions
Safety should always be a top priority when working with power tools. Follow these precautions to minimize the risk of accidents:
- Wear safety glasses to protect your eyes from flying debris.
- Use a dust mask or respirator to prevent inhalation of sawdust.
- Keep your fingers away from the blade by using a push stick or push block.
- Ensure the table saw is properly grounded.
- Avoid loose clothing or jewelry that can get caught in the machinery.
- Read and understand the manufacturer’s instructions and warnings before operating the table saw.
By taking these precautions, you can create a safe working environment and prevent potential injuries.
Cut A Taper On A Table Saw
Setting Up The Table Saw
Before you start cutting tapers, it’s essential to set up your table saw correctly. Follow these steps:
- Ensure the table saw is placed on a stable and level surface.
- Adjust the blade height to slightly higher than the thickness of your workpiece.
- Align the fence parallel to the blade, ensuring it is securely locked in place.
- Check that the miter gauge is square to the blade.
- Verify that all the safety features, such as blade guards and riving knives, are properly installed and functioning.
Taking the time to properly set up your table saw will ensure accurate and safe taper cuts.
Adjusting The Fence And Blade Angle
To create a taper, you need to adjust both the fence and the blade angle on your table saw. Here’s how to do it:
- Loosen the fence and slide it to the desired distance from the blade, depending on the width of the taper you want to cut.
- Use a tape measure to ensure an equal distance on both ends of the fence for a balanced taper.
- Tighten the fence securely to hold it in place.
Next, you need to set the blade angle:
- Locate the bevel adjustment mechanism on your table saw.
- Loosen the bevel lock and adjust the blade angle to the desired degree. Typically, a taper angle ranges from 1 to 10 degrees.
- Tighten the bevel lock to secure the blade angle.
By adjusting the fence and blade angle, you can control the width and angle of the taper cut.
Marking The Taper
Accurate marking is crucial for achieving precise taper cuts. Follow these steps to mark your workpiece:
- Use a pencil or marking knife to make a reference line along the length of the workpiece. This line will serve as a guide for the taper cut.
- Measure and mark the starting and ending points of the taper on the reference line. Ensure the distance between the marks matches the desired length of the taper.
Clear and precise marking will help you stay on track while cutting the taper.
Cutting The Taper
Now that your table saw is set up and your workpiece is marked, it’s time to cut the taper. Follow these steps:
- Position the workpiece against the fence, aligning the starting mark with the blade.
- Hold the workpiece firmly and engage the table saw by turning it on.
- Using a push stick or push block, apply gentle pressure to feed the workpiece into the blade.
- Maintain a steady and even feed rate throughout the cut.
- Keep your hands clear of the blade and always use a push stick or push block to guide the workpiece.
Take your time and focus on maintaining a smooth and controlled feed to ensure a clean and accurate taper cut.
Testing And Fine-tuning
After cutting the taper, it’s essential to test the fit and appearance of the workpiece. Here’s what you can do:
- Place the tapered end against the corresponding surface or joint to assess the fit.
- Check for any gaps or inconsistencies.
- If necessary, make slight adjustments to the taper by repeating the cutting process with small modifications to the fence or blade angle.
Testing and fine-tuning your taper cuts will help you achieve the desired results and ensure a seamless integration into your project.
Tips For Successful Taper Cuts

To enhance your taper cutting skills, consider the following tips:
- Start with scrap wood: Practice cutting tapers on scrap wood before working on your actual project to gain confidence and refine your technique.
- Take small increments: For more pronounced tapers, make multiple passes with small adjustments to the fence or blade angle to gradually achieve the desired angle.
- Use featherboards: Featherboards can help keep the workpiece firmly against the fence, minimizing the risk of kickback and ensuring a consistent cut.
- Make test cuts: Before cutting the actual workpiece, make test cuts on a similar piece of wood to fine-tune your technique and make any necessary adjustments.
- Maintain a clean work area: Sawdust and debris can interfere with the accuracy of your cuts. Regularly clean the table saw and work area to ensure a clear and safe cutting environment.
By implementing these tips, you can improve your taper cutting skills and achieve professional-looking results in your woodworking projects.
Common Mistakes To Avoid
While cutting tapers on a table saw, it’s important to be aware of common mistakes that can compromise the quality of your cuts. Avoid the following errors:
- Inconsistent feed rate: Uneven pressure or inconsistent feeding can result in an uneven and jagged taper. Maintain a steady and controlled feed rate throughout the cut.
- Incorrect blade angle: Failing to set the blade angle accurately can lead to tapers that are either too steep or too shallow. Take the time to adjust the blade angle precisely according to your desired taper.
- Insufficient marking: Inadequate or imprecise marking can result in inaccurately aligned taper cuts. Double-check your markings and ensure they are clear and aligned with the reference line.
- Lack of safety precautions: Neglecting safety measures can lead to serious injuries. Always wear appropriate safety gear, use push sticks or push blocks, and follow the manufacturer’s instructions for safe operation.
By avoiding these common mistakes, you can achieve cleaner, more accurate taper cuts and ensure a safer woodworking experience.
Cleaning Up the Workpiece
After completing the taper cuts, you may notice rough edges or splinters on the workpiece. Follow these steps to clean up the tapered surface:
- Use sandpaper or a sanding block to smooth out any rough edges or uneven surfaces.
- Sand along the grain of the wood, gradually progressing to finer grits of sandpaper for a smooth finish.
- Remove any dust or debris from the workpiece using a brush or compressed air.
Taking the time to clean up the tapered surface will enhance the overall appearance and feel of your finished project.
Additional Techniques For Taper Cuts
While the table saw is a primary tool for cutting tapers, there are alternative techniques you can explore:
- Hand plane: A hand plane can be used to refine and adjust the taper, especially for small-scale projects or when precision is required.
- Band saw: A band saw with a tilting table allows you to cut tapers with curved or irregular shapes. It provides greater flexibility in taper design.
By incorporating these additional techniques, you can expand your repertoire of taper cutting methods and explore different design possibilities.
FAQs
Can I cut tapers on a miter saw instead of a table saw?
While a miter saw can make angled cuts, it is not ideal for cutting tapers. Table saws provide more control and accuracy for taper cutting.
What types of wood are suitable for taper cuts?
Taper cuts can be made on various types of wood, including hardwoods and softwoods. It’s important to consider the wood’s stability and grain direction for successful taper cuts.
Are taper cuts only for furniture legs?
No, taper cuts can be used for a wide range of woodworking projects, including table edges, decorative elements, and more. They add a unique touch to any design.
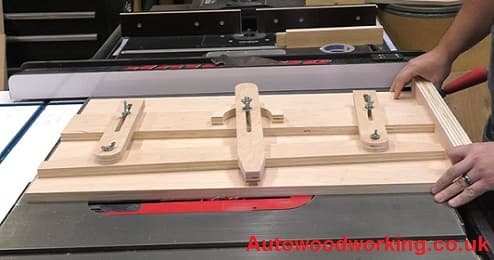
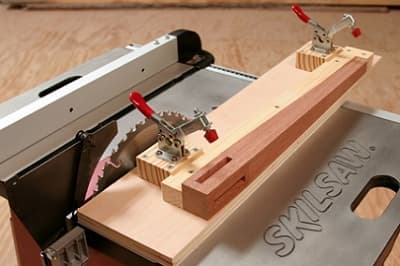
Can I use a tapering jig for cutting tapers on a table saw?
Yes, a tapering jig is a helpful accessory for cutting tapers on a table saw. It provides additional support and guidance, ensuring precise and consistent taper cuts.
What is the ideal angle for a taper cut?
The ideal angle for a taper cut depends on the specific project and design preferences. Common taper angles range from 1 to 10 degrees, but you can adjust it according to your desired aesthetic.
Conclusion
Cutting tapers on a table saw is a valuable skill for woodworkers of all levels. With the right tools, proper setup, and attention to safety, you can create precise and visually appealing taper cuts that elevate your woodworking projects. By following the step-by-step guide and implementing the tips and techniques discussed in this article, you’ll be well on your way to mastering the art of taper cutting.


