As an Amazon Associate, I earn from qualifying purchases.
A router table can be the perfect tool for any woodworking workshop It’s also not so difficult to operate than you may believe. In this post I’ll explain how to setup and use a router table along with a few suggestions on what you can do to make the most value from this multi-functional tool.
What is a Router Table?
A router table is a stationary woodworking machine that holds a router securely in an upside-down position. It provides a stable platform for the router, allowing you to guide the workpiece across the spinning router bit instead of maneuvering the router itself. This setup offers greater control and accuracy, making it ideal for tasks such as edge routing, joinery, and shaping wood.
Benefits of Using a Router Table
Using a router table offers several advantages over freehand routing. Firstly, it enhances safety by providing a stable work surface and minimizing the risk of accidental slips or hand injuries. Additionally, it allows for more precise and consistent cuts, enabling you to achieve professional-level results. The router table also provides better control over the workpiece, making it easier to create intricate designs and custom profiles.
Types of Router Tables
There are different types of router tables available, each catering to specific needs and preferences. Let’s explore the most common types:
Benchtop Router Tables
Benchtop router tables are compact and portable, designed to be placed on top of a workbench or any sturdy surface. They are suitable for smaller woodworking projects or if you have limited space in your workshop. Benchtop router tables are lightweight and can be easily transported, making them a popular choice among hobbyists and DIYers. They offer convenience without compromising on functionality, providing a stable platform for routing tasks.
Floor-Standing Router Tables
Floor-standing router tables are larger and more robust than benchtop models. They come with their own sturdy stand, providing a dedicated workspace for woodworking projects. Floor-standing router tables are designed for professional use or for those who work on larger, more demanding projects. They offer stability, durability, and additional features such as built-in dust collection systems.
Cabinet Router Tables
Cabinet router tables are the most advanced and heavy-duty option. They are built into a cabinet-style structure, offering ample storage space for router accessories, bits, and other woodworking tools. Cabinet router tables are designed for professional woodworkers who require a high level of precision and versatility. They often come with advanced features like router lifts for easy height adjustments and micro-adjustable fence systems.
Contents
Setting Up A Router Table
Before you start using a router table, it’s essential to set it up properly. Here are the steps involved in the setup process:
Choosing the Right Location
Select a suitable location for your router table. Ensure that you have enough space to maneuver the workpiece and access the router controls comfortably. It’s also crucial to have sufficient lighting and ventilation in the area.
Assembling the Table
Follow the manufacturer’s instructions to assemble the router table. This typically involves attaching the tabletop to the stand or base, securing the fence, and adjusting any additional components.
Mounting the Router
Mount your router securely to the router table. This process may vary depending on the specific model you have. Refer to the router table and router manuals for detailed instructions on mounting.
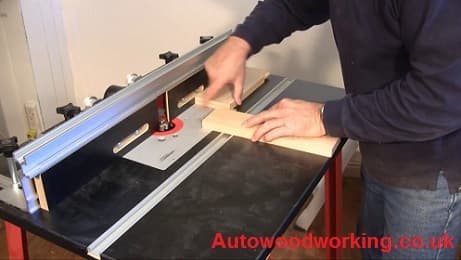
Adjusting Fence and Bit Height
Set the fence to the desired position based on your routing task. The fence acts as a guide, allowing you to control the direction and depth of the cut. Adjust the bit height as well, ensuring it protrudes through the tabletop enough to perform the desired cut.
Safety Precautions
When using a router table, safety should be your top priority. Here are some essential safety precautions to follow:
Wearing Protective Gear
Always wear safety glasses or goggles to protect your eyes from flying debris. Use hearing protection, such as ear muffs or earplugs, to reduce noise levels. If working with larger workpieces, consider using a dust mask or respirator to avoid inhaling fine wood particles.
Understanding the Router Operation
Familiarize yourself with the router’s controls, including the power switch, depth adjustment, and speed settings. Read the router manual to understand its specific features and safety guidelines.
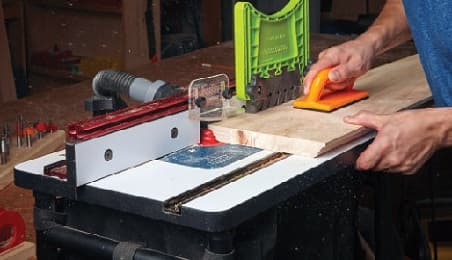
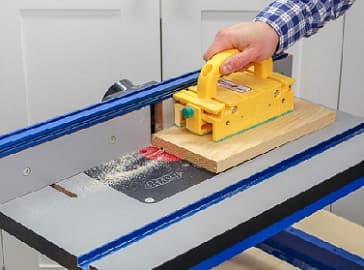
Securing the Workpiece
Ensure that the workpiece is securely fastened to the router table using clamps or hold-downs. This prevents the wood from moving or vibrating during the routing process, reducing the risk of accidents.
Maintaining a Clean Workspace
Keep your workspace clean and free of clutter. Remove any loose objects or debris that could interfere with the routing process or cause accidents. Regularly clean the router table and surrounding area to prevent sawdust buildup.
Basic Router Table Techniques
Once your router table is set up and you’ve taken the necessary safety precautions, you can begin exploring various routing techniques. Here are some basic techniques to get you started:
Edge Routing
Edge routing involves using the router table to create decorative edges on wooden boards. By guiding the workpiece along the fence, you can shape the edges with precision. This technique is commonly used to create decorative mouldings or profiles on furniture pieces.
Rabbeting
Rabbeting refers to cutting a groove along the edge of a workpiece. It is often used to join two pieces of wood or create recesses for panels or glass in cabinet doors.
Dado and Groove Cutting
Dado and groove cutting involve creating a channel or slot in a workpiece to accommodate another piece of wood. This technique is commonly used in joinery, such as constructing shelves or cabinets with adjustable shelves. The router table’s fence and bit height adjustments allow for precise and consistent cuts.
Box Joint and Dovetail Joinery
Router tables can be used to create strong and visually appealing joinery, such as box joints and dovetails. These joints provide a secure connection between two pieces of wood without the need for additional fasteners. Router table jigs and accessories, such as dovetail jigs, can assist in achieving accurate and repeatable results.
Advanced Router Table Techniques
Once you’ve mastered the basic techniques, you can explore more advanced applications of a router table. Here are a few examples:
Raised Panel Door Making
Router tables are commonly used in creating raised panel doors. This technique involves using a panel raising bit to shape the edges of the door panel. The router table’s stability and precision ensure consistent results, adding elegance to your woodworking projects.
Template Routing
Template routing involves using a pre-made template to guide the router along a specific path. This technique allows for the creation of complex shapes and patterns with ease. By attaching the template to the workpiece and using a flush-trim bit, you can replicate intricate designs accurately.
Router Table Jointing
Router tables can be used as a jointer alternative for edge jointing. By running the edge of a workpiece along the fence and against a straight bit, you can achieve a smooth and straight edge. This technique is useful for preparing boards for glue-ups or creating seamless joints.
Router Table Jigs and Accessories
Various jigs and accessories are available to expand the capabilities of your router table. These include box joint jigs, featherboards, coping sleds, and more. Each accessory serves a specific purpose, offering increased precision, safety, and efficiency in your woodworking projects.
Troubleshooting Common Router Table Issues
While using a router table, you may encounter some common issues. Here are a few troubleshooting tips:
Router Bit Burning
If you notice burn marks on the wood caused by the router bit, it may be due to excessive speed, dull bit, or improper feed rate. Adjust the router speed, ensure you’re using a sharp bit, and feed the workpiece steadily to avoid burning.
Tear-out and Chip-out
Tear-out or chip-out can occur when the wood fibers splinter or break during routing. To minimize this issue, use a sharp and appropriate bit for the wood type, ensure proper feed direction, and consider using a backing board or sacrificial piece to support the wood fibers.
Router Bit Chatter
Router bit chatter can cause uneven cuts and rough surfaces. To reduce chatter, make sure the bit is securely fastened, maintain a consistent feed rate, and consider using a router speed appropriate for the bit size and material.
Router Table Maintenance
Regular maintenance of your router table is essential for optimal performance. Keep the table clean and free of sawdust and debris. Lubricate moving parts as recommended by the manufacturer. Inspect the router and its components regularly for any signs of wear or damage.
FAQs
Can I use any router with a router table?
Yes, most routers can be used with a router table. However, it’s important to ensure that the router is compatible with the specific router table you have or plan to purchase. Check the manufacturer’s guidelines or consult with a woodworking specialist to determine the best router-table compatibility.
Do I need special bits for a router table?
While you can use standard router bits with a router table, there are certain bits specifically designed for router table use. These include panel-raising bits, edge-forming bits, and joinery bits. These specialized bits offer enhanced performance, safety, and precision when used on a router table.
How do I choose the right router table size?
When selecting a router table, consider the size of your woodworking projects and the available space in your workshop. If you primarily work on smaller pieces, a compact router table may suffice. For larger projects or professional use, a larger table with ample workspace is recommended. Take measurements and compare them to the dimensions provided by the manufacturer to ensure a proper fit.
Can a router table replace a hand router?
While a router table is a versatile tool, it cannot completely replace a handheld router. Both tools have their unique advantages and applications. A router table excels in tasks that require precision, control, and stability, such as edge routing or joinery. A handheld router, on the other hand, offers greater flexibility and portability, making it suitable for tasks that require maneuverability or working on larger workpieces.
Is it safe to use a router table without experience?
It is not recommended to use a router table without prior experience or proper knowledge of woodworking techniques. Router tables involve spinning router bits and require careful attention to safety precautions. If you’re new to woodworking or using a router table, it is advisable to seek guidance from experienced woodworkers, take woodworking classes, or thoroughly study router table operation and safety guidelines before attempting any projects.
Conclusion
Using a router table opens up a world of possibilities in woodworking. With proper setup, safety precautions, and knowledge of various techniques, you can achieve precise and professional results. Whether you’re a beginner or an experienced woodworker, the router table is a valuable tool that enhances your craftsmanship.


